In this posting, we’ll discuss the server setup for the demo app.
The passkey is used in two places: Registration (creating an account), and logging in. After login, the server works in the same way that most of these types of things work.
Server Configuration
NOTE: The server source files are located in this directory.
The PassKeys Demo server is a simple, 1-file PHP program. It’s designed to be installed on a fairly typical LAMP hosting server, with a fairly minimal hosting environment.
It requires PHP 8 or above (but may work fine for older versions -we just haven’t tested on such), and MySQL 5.4 or above (but the SQL syntax is very “generic,” and will probably work fine on other databases. It uses PHP PDO, internally, as a simple database abstraction/hardener).
The server relies on the well-established WebAuthn PHP Library, to provide authentication services.
There are two database tables: One is used to strore the passkey credentials, and the other stores the actual user data that is presented and modified by the UI. The user never sees most of the passkey credential information.
The data stored are two strings: A “Display Name,” and a “Credo.”
For purposes of this demonstration, these strings are limited to 255 characters in length.
Implementation
In order to use the server, you need to set up a LAMP server, and initialize a new database, with the contents of the Meta/MySQLStructure.sql file. This creates two tables. You also need to set up a database user, and assign it to the new database, with all standard permissions (no need for admin ones, like GRANT).
You then need to set up a configuration file. This is accomplished by editing the Meta/Config.php file with the values necessary to access the server, and then placing that in another directory (we suggest one that is outside the HTTP directory path, so it can’t be scanned). Edit the index.php file, so that its require line brings in the edited Config.php file.
Copy all these files (not in Meta) to your server, into the HTTP path.
composer.json
index.php
PKDServer.class.php
Once you have the server code set up, use SSH or the Console, to navigate to the server directory, and enter:
$> composer update
That will bring in the WebAuthn PHP Library, and create a directory called vendor. Ignore that directory. The script knows what to do with it.
The basic PHP server should now be ready.
However, we also need to set up the apple-app-site-association file (here, in the Meta subfolder), This goes into the invisible .well-known directory, at the HTTP root of your server. This will be necessary, so the app can use PassKeys to interact with your server. You will also need to change the app bundle ID to match your bundle (the sample is the one used for my sample app).
This is what the file’s contents look like:
{
  "webcredentials": {
    "apps": [
      "<your TEAM ID>.<the APP BUNDLE ID>"
    ]
  }
}
Note the placeholders in the above example. In the demonstration app, these are expressed as:
{
  "webcredentials": {
    "apps": [
      "P53V4JS928.com.littlegreenviper.PassKeysDemo"
    ]
  }
}
The team ID is your Apple Developer Team ID (Log in, and scroll down to find your Team ID).
This works for my app, but you’ll likely need to change it for your implementation.
When you are done, the server should look something like this (from my own example server, Yours will have different names):
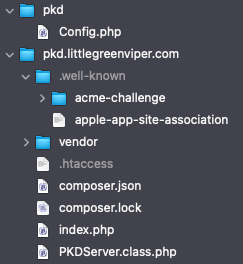
In my setup, pkd.littlegreenviper.com is the HTTP root. Note the pkd directory, outside that root. It contains the Config.php file, and the index.php file looks like this:
require_once "./PKDServer.class.php";
require_once "../pkd/Config.php";
new PKDServer();
The acme-challenge directory is used by the server’s SSL implementation. Your server may or may not have it. Ignore it, and leave it alone, if it’s there.
The composer.lock file is an artifact of the composer update. Leave it there.
The .htaccess file is not always necessary, but I found that I had to ensure that the apple-app-site-association file had to be explicitly coerced into presenting as JSON, so it looks like this:
<IfModule mod_headers.c>
    <Files "apple-app-site-association">
        ForceType application/json
        Header set Content-Type "application/json"
    </Files>
    <FilesMatch "^apple-app-site-association$">
        ForceType application/json
        Header set Content-Type "application/json"
    </FilesMatch>
</IfModule>
It’s likely that your implementation should work fine, without it.
The CRUD
- Create – This is how a user registers a new account. They provide a string that is used as a “tag” for the passkey that will represent the account on the server. After creating the passkey, they select that passkey, whenever they want to log in.
- Read – After the user logs in, their client reads the data stored in the server, and populates the UI elements.
- Update – After the user logs in, their client allows them to change the Display Name and the Credo, to be stored on the server.
- Delete – After the user logs in, they can delete their entire server account.